.png)
Hi! Welcome to my walkthrough for repairing an RV roof. It might look like a big job at first glance, but once you break it down into manageable steps, it’s totally doable. Before we get into this, if you want your roof coated, sealed, repaired, or replaced by us, visit our RV roof page or contact us.
Things like A/C units, vents, and antennas need to come off first. They’re typically bolted down and sealed to prevent leaks, so grab a wrench, remove the bolts, and gently lift each appliance off. If any sealant is in your way, carefully cut through it to avoid damaging the roof.
Next up are the roof moldings along the edges of your RV’s roof. They’re usually held by screws and sealed with caulk. Use a flathead screwdriver or a putty knife to pry them off gently and do not nick any surrounding surfaces.
After the appliances and moldings are gone, cut the old rubber roof into manageable sections. Peel each piece away and use an adhesive remover to get rid of any leftover gunk. This is also the perfect time to check the underlying wood for water damage or rot.
If you spot rotten or warped wood, swap it out for new plywood or Lauan. A solid foundation means your new roof will stay sturdy and leak-free for years to come. If you think it's starting to become too much to handle, reach out to us and we can take care of it. Our roof options are detailed on our roof page or you can fill out a form and let us know what you're looking for.
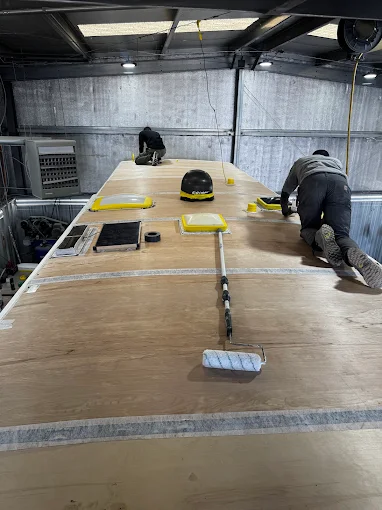
Lauan plywood is a popular choice for RV roofing because it’s both lightweight and solid. Secure it firmly with screws so there are no squeaks or gaps. Make sure each sheet lines up neatly. Any bumps or splinters now will show through once we add the new membrane.
Next, spread a heavy duty RV roof adhesive designed for rubber membranes. Cover the whole Lauan surface in even strokes. This adhesive is key to making sure the rubber roof sticks around for the long haul.
Carefully unroll the rubber membrane over the adhesive, smoothing out any wrinkles as you go. Work in sections, using a roller or your hands to make sure it’s laid down nice and flat. Trim the edges to fit your RV’s roof dimensions, leaving a little extra overlap for a perfect seal around corners.
With your new roof set, it’s time to put the rooftop gear back where it belongs.
Place each appliance back into its original spot, aligning it with the pre-cut openings. Use new or resealed gaskets, plus fresh caulk, to keep water from sneaking in. Go easy on the screws—overtightening can damage your brand-new roof material.
Flip on your A/C unit, run vent fans, or turn on your satellite if you have one. Making sure everything works now saves a lot of hassle later.
If your old moldings are in decent shape, give them a quick cleanup, reseal them with butyl tape, and screw them back in. Otherwise, cut new moldings to size, secure them along the edges, and cover any gaps with a waterproof sealant.
Once the moldings are screwed down, apply a bead of caulk where the edges meet the roof membrane. Smooth it out with a putty knife or your finger—this step helps ward off leaks and keeps everything looking tidy.
Fresh caulking is your best friend when it comes to preventing leaks. We recommend checking your caulking before and after the season.
Run a line of caulk along the perimeter where the moldings meet the new roof. This seals off any cracks or micro-gaps that water might try to sneak through.
Carefully apply self-leveling caulk around every fixture including A/C units, vents, antennas, etc. Make sure to use a UV resistant product specifically designed for RV roofs, so it stays flexible despite temperature swings.
We replace all damaged roof components and appliances as a part of our roof repair process.
If you have a satellite dish, solar panels, or other add-ons, caulk around their mounting brackets, too. Be generous as water can slip through even the tiniest holes.
Wipe down the surface to remove any leftover adhesive, sawdust, or smudges from caulking. A mild, RV-safe cleaner works great. You can also use Dicor's RV roof cleaning products.
Double-check all seals, edges, and fixtures. Look for any spots you might have missed. Better to fix a small oversight now than find a leak later.
For an extra layer of defense, consider using a rubber roof protectant spray that shields the membrane from sun damage. It’s a quick step that can keep your new roof looking fresh for longer.
